Shell Access
Overview
The Swiftor Terminal provides command-line access to your development workspace and connected VM deployments. It features multiple sessions, UI-driven controls, search, copy/paste, and standard shell capabilities like command history and tab completion (within the connected shell).
By default, you are connected to your primary "workspace" shell. You can open additional shells for any active VM deployment.
Connecting to Shells
Connections are managed through the UI:
Session Dropdown: Located in the header, this dropdown shows your current shell (e.g.,
~/workspace). Clicking it opens a menu displaying: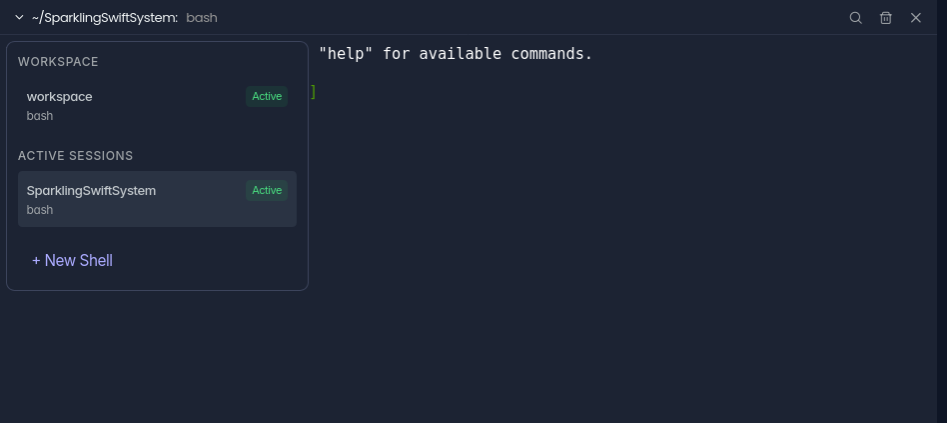
- Workspace: Your primary development shell. Always available.
- Active Sessions: Any other VM shells you have connected to. Click to switch.
- + New Shell: Opens the VM selection view.
New Shell View: Accessed via the "+ New Shell" button in the dropdown.

- Search for available, active VM deployments by name.
- Click on a VM to open a new shell session for it. The dropdown menu will update, and the new session will become active.
Switching Sessions
Use the Session Dropdown in the header to quickly switch between your workspace shell and any open VM shells. The dropdown shows the last command run in each inactive session.
UI Controls
The terminal interface includes several controls:
- Session Dropdown (Header Left): Click to view/switch active sessions or open the "New Shell" view. Shows the current working directory (
~/vm-label) and last command. - Search Icon (Header Right): Toggles the visibility of the search bar for the active session.
- Clear Icon (Header Right): Clears the scrollback buffer of the active session.
- Kill Icon (Header Right): Closes the currently active session (disconnects the socket and removes it from the UI). The Workspace shell cannot be killed this way.
- Search Bar (Below Header, when active): Input text to search within the active terminal's output. Use Enter for next match, Shift+Enter for previous. Press Esc to hide.
- Context Menu (Right-click): Provides quick actions:
- Search in Shell (opens search bar)
- Select All
- Copy (copies selected text)
- Paste (pastes from clipboard into the shell)
- Clear Terminal
- Disconnect (same as Kill Icon)
Working Inside a Shell
Once connected to a shell (either Workspace or a VM):
- You have standard command-line access.
- Run any commands supported by the shell environment (e.g.,
ls,cd,git,docker, etc.). - The prompt typically shows user and hostname/VM label.
- Standard shell features like command history (
↑/↓), tab completion, and shortcuts (Ctrl+C,Ctrl+L, etc.) are generally available (provided by the underlying shell andxterm.js). - Type
exitin the shell to close the connection from the server-side (this will also trigger a disconnect in the UI).
Productivity
Use tab completion and command history (Up/Down arrows) within the shell, and leverage the UI search and copy/paste features for efficiency.
Example Session
- Open the Swiftor Dashboard; the Terminal panel connects to
~/workspaceautomatically. - Run commands in the workspace:
ls -la,git status. - Click the Session Dropdown (
~/workspace: ...). - Click + New Shell.
- Search for and click on an active VM (e.g.,
my-app-vm). - A new session
~/my-app-vmopens. Run commands inside the VM:cd /app,npm install. - Click the Session Dropdown (
~/my-app-vm: ...) and selectworkspaceto switch back. - Right-click in the terminal and select "Copy" to copy output.
- Right-click and select "Paste" to paste commands or text.
- Click the "Kill" icon in the header while the
my-app-vmsession is active to close it.
VM State
You can only connect to VMs that are currently running and enabled. Use the main Deployments dashboard to manage VM states (start, stop, delete).